Pages

Showing posts with label completed projects. Show all posts

Wednesday, July 25, 2012

DIY chalk paint dining chairs: a review

After the dining table was completed and in place, it took us weeks to find dining chairs. I was set on finding some metal Tolix style knockoffs, and was probably going to buy some from Overstock.

But then my husband brought home four chairs from a yardsale for just five bucks for the lot.  Yes, the same husband ( I do only have one, afterall) who bought two desks for $10 from a different yardsale.

The four chairs were three matching blond/yellow wood ones (sorry, I forgot to take before pictures!) and a fourth black one (that one lives by the computer now).
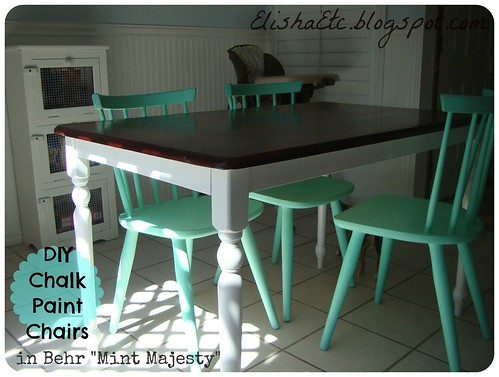
behr mint majesty
I've already mentioned our small dining area is a challenge to find furniture for, and it was going to be an even bigger challenge to find the right-sized chair for the teeny dining table.


My husband had intended these chairs to be temporary, and I agreed; I hated their yellow-and-mildew color tones!

But as time wore on, I realized they were just the right size. And, we already had them anyway... time to mend and make do.
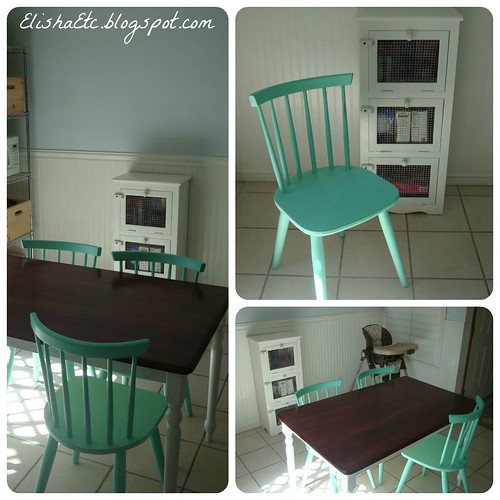
mint chalk paint chairs
First, I tried spraypaint. The Rustoleum Satin Green Apple just wasn't the right shade OR finish. So the lone spraypainted chair sat outside for a few days before I decided what to do next. That decision came to be chalk paint.

I probably don't have to tell you that Annie Sloan Chalk Paint is taking the web by storm. I was totally surprised to find that there's an AS retailer in my town, and was all prepared to pay for it.

But then, I got to thinking... I guessed it was around $35 bucks for a quart of Annie Sloan, and I was pretty close. These chairs were just $1.25 each. It seemed to sort of go against the frugal find that they were if I were to cover them in expensive paint. Plus, there wasn't the right shade of minty green on the AS color chart.

I'd already been seeing all the DIY chalk paint recipes when this post popped up on Apartment Therapy. Most recipes have you mix Plaster of Paris, water, and latex paint in precise measurements and ratios, but the one on AT said the gal kinda winged it until she found a consistency she liked. Works for my lazy artsy, go-with-the-flow self.

I planned on using the lines on the side of my quart container to make pretty precise measurements, and filled Plaster of Paris up to the first line. I thought I was putting water up to the second line when I noticed there was way too much water.

Instead of dumping out the water and PoP to start over like I should have, I went ahead and added my paint, Behr latex paint and primer in one in the color "Mint Majesty". It took a lot of paint to catch up to all the water, and I got a very watery DIY Chalk Paint mixture to work with.

Still, I loved how my first chair came out. I'd done minimal sanding and hadn't technically primed it, which is a supposed benefit of chalk paint-- especially if you're using the real Annie Sloan deal. But it HAD been painted with that apple green Rustoleum, which was acting like a kind of primer.

The next two chairs were another story. With having a little one, I didn't get to do all three at once. So my DIY chalk paint mixture sat overnight. Maybe I should have Googled whether or not leftover DIY chalk paint keeps.

By the next day, the PoP had settled to the bottom in a thick layer. The water was on top. I mixed it up and started painting anway.

I love the color of all three chairs, although I think the first one came out more saturated because of the layer of apple green underneath. But the second two also came out with some large glops of PoP here and there thanks to the day-old mixture. There are brush strokes on the seats, while the first one came out with a smooth seat.

I distressed all three before finishing them off with a couple of layers of Minwax pastewax.

The verdict: I might use DIY chalk paint again, but not for any projects I have in my current queue. This hasn't turned me off from trying the real ASCP, but I think the price for AS has. I like my Behr latex paint and primer in one and plan on mostly sticking with that.

This post is linked at:
Ginger Snap Crafts, Someday Crafts, Southern Lovely, House of Hepworths, Momnivore's Dilemma,

Tuesday, July 24, 2012

"Thomas the Tank Engine" post round-up

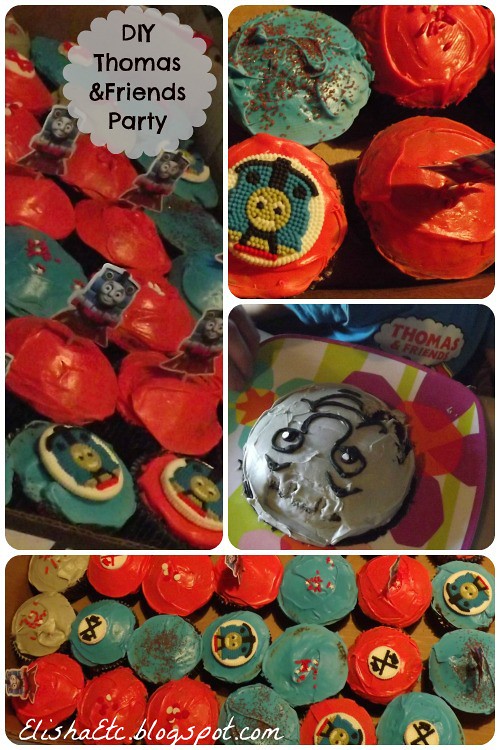
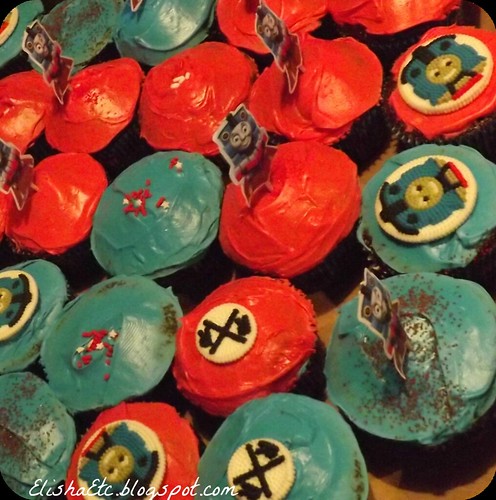
diy thomas party
I hadn't planned on posting these cupcakes from my son's Thomas the Train first birthday party, because we all know I'm no baking expert, or cake-decorating expert.

But then a lot of people started landing on my blog by Googling variations of "Thomas the Train DIY Birthday Party" and the like, so I thought it might be helpful to share what we actually did. I also thought it was a good way to round up my previous Thomas posts...   diy thomas train birthday
My husband baked these cupcakes, and then we decorated them together. He made the cake batter from scratch, but we cheated and used store-bought frosting! We're kickin' it on the "Semi-Homemade" tip. The frosting was a white (so likely vanilla, buttercream, or creamcheese?) flavor from Pillsbury or Duncan Hines. I know, helpful.

We didn't use foodcoloring on the frosting, opting instead for Wilton frosting coloring (available at WalMart and Jo-Ann) in red, blue, and black to create gray, light blue, and hot pink red cupcake tops.

I sprinkled some with red and white sprinkles, some with red only, poked some Thomas the Tank Engine Party toothpicks, and placed sugar Thomas icing decorations on others. We bought the toothpicks, sugar decorators, and lots of other decorations from Party City. Some plates and cups were purchased from Target.

For our DIY Thomas the Tank Engine Smash Cake, we just picked out one of our smaller rectangular cake pans and backed it in there. Once it was baked, we cut a good-sized circle from the rectangle (pictured in the collage above). Husband frosted it with gray frosting and I used a Wilton black icing tube to draw Thomas' face on it.

Links to my other Thomas and Friends posts:


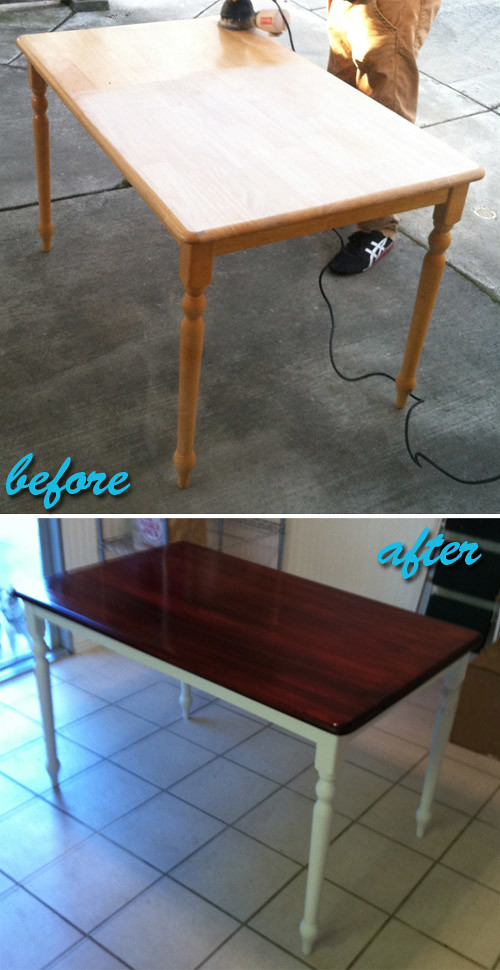
Before & After: Dining Table Makeover

Our dining area in our small eat-in kitchen is a challenge to get just the right-sized table for.

We'd first bought an awesome mahagony table off Craigslist for just $40... and it ended up being way too big.
farmhouse table before after
So we snatched this table up when we saw it at the thrift store. It was priced higher than I wanted to pay for a rinky-dink table like this, even on sale, but it was the right size for the space.

I directed my husband to remedy the yellow/orange wood with a coat of dark stain on the top, and to paint the base white. I'll just say, I would've used different materials than what he chose (spraypaint and all-in-one stain/poly), but it's still pretty close to what I wanted. I wish he would've put one more coat of poly or the stain/poly on top, but I love the color.

I know I usually post a materials breakdown, but I have now idea what either of these colors are! A satin Rustoleum on the spraypaint with no top coat, and the stain/poly in one is most likely by Minwax.

Friday, July 20, 2012

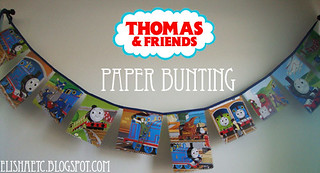
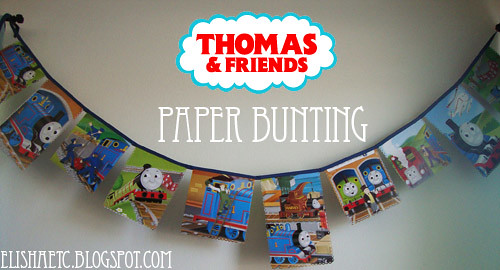
Thomas & Friends birthday party bunting (paper)

thomas the train bunting paper 1
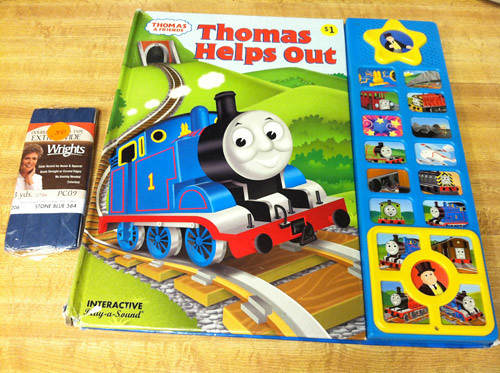
I hadn't planned on making two sets of bunting for the young mister's birthday party, but when I saw this book for just a buck at the thrift store, I thought it should come home with us.
ttrainbook
It's one of those books that makes sounds... but this book was pretty old and beat up, so the sounds were less children's book and more creepy horror movie-- all scratchy and hard to hear.

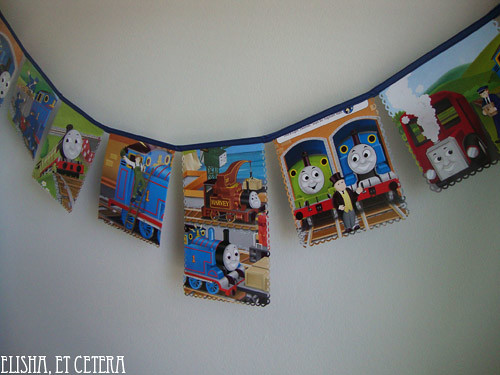
I thought I could rescue it by giving it new life-- Thomas the Train Book Bunting! I used thrifted bias tape for the project as well.
thomas the train bunting paper 3
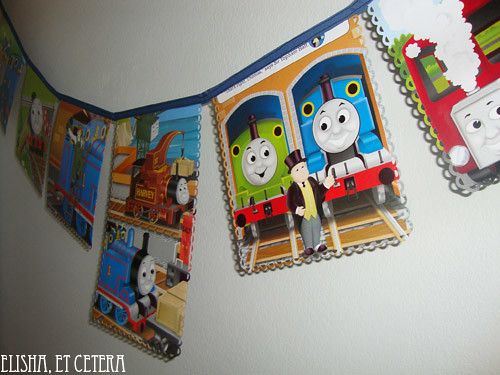
I actually made this one before the Thomas the Train Fabric Bunting, which is now hanging in his room. I decided that hanging this one too might be overkill, so... I'm actually going to disassemble this one and use it in a different project! This Thomas the Train book is getting more lives than a cat.

I used a fancy paper punch around the edges, which kinda gave it a Papel Picado feel.
thomas the train bunting paper 2

Thomas & Friends Book Bunting
Materials: Thomas the Train Book ($1 - thrifted), bias tape (.50 cents - thrift store), thread
Total cost: ~$1.50

Tuesday, May 22, 2012

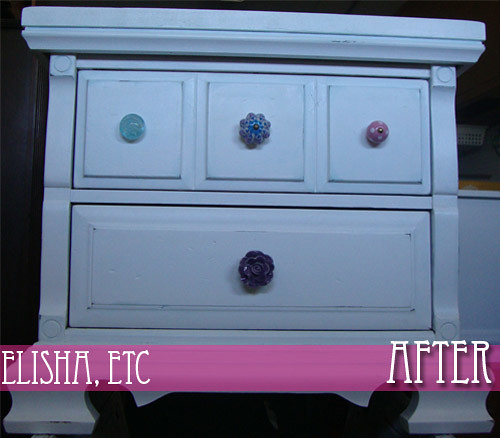
Before & After: nightstand makeover

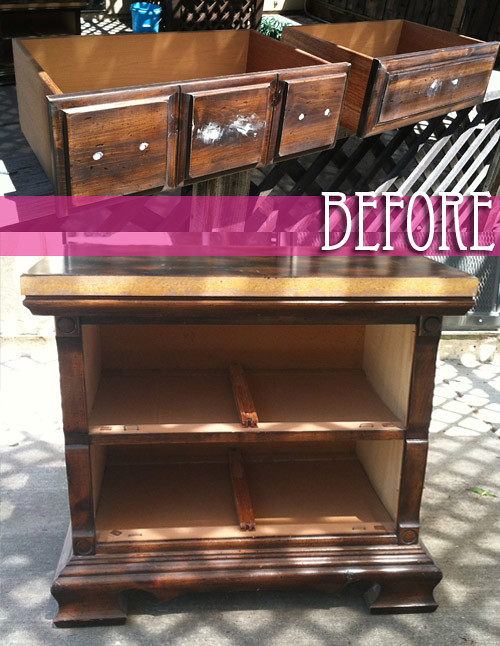
nightstand makeover before
Shabby chic: ya either love it or ya hate it.

I happen to love it... as long as it's not total overboard like you're living in some countryside Northeastern (1980s) bed and breakfast. I like the muted whites and florals that the look is known for, but I also love color and other graphic prints too much to go full-on with it.

And of course I love vintage, retro, antique... just plain OLD stuff. Always have. So that's perhaps what I find most appealing of all about the SC aesthetic. The aged, loved, worn, and yes, distressed (even it's it's faux distressed) fabrics and woods.

Don't be hatin'.

Among the old things I don't love: 1970s veneer. So when I bought this nightstand, I full intended on painting it all along.

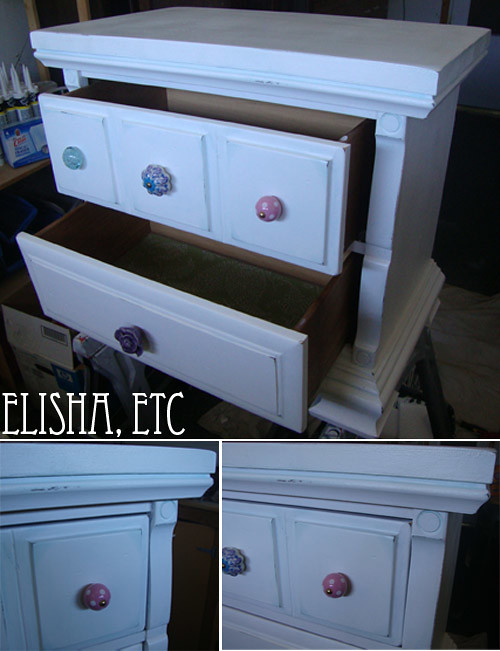
And here she is now!
nightstand makeover after 2
I know you've seen these "white with distressed paint" makeovers all over the blogosphere so it's nothing really special, but I'm really happy with it!

It was my first attempt at making over a piece of furniture. Oh, I've painted plenty of stuff, but I've never sanded, primed, chosen new hardware, done specialty finishes like faux distressing and blue washes, then sealed.

My previous endeavors were "paint over the old paint until you can't see said old paint any longer aaaaannd.. done".

It'll now live next to my bed and probably hold some sewing stuff spilling over from my craft nook. I hope I get to do more projects like this in the future! nightstand makeover after 1
White Nighstand Makeover
Nightstand: veneer and wood nightsand (~16.50 - thrift store)
Hardware: mismatched knobs (~15 - World Market)
Paints: white primer and latex paint in one (husband chose it! $14 for full can used on two night stands - Home Depot), Minwax past wax (~$10 - Lowes)
Total cost: ~48.50

Thursday, May 17, 2012

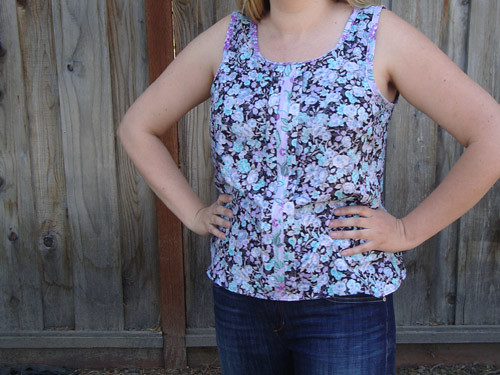
Colette Sorbetto: purple floral

floral sorbetto1
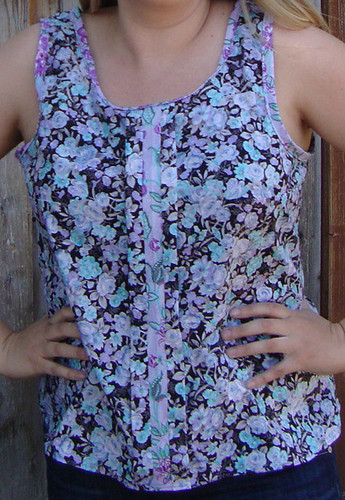
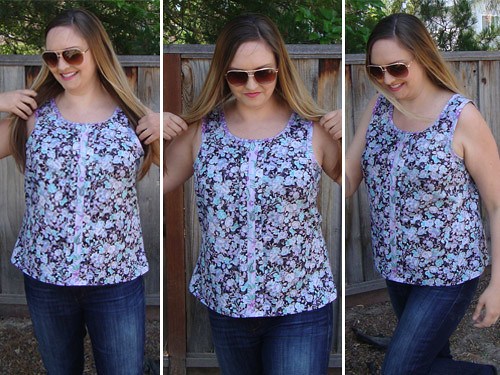
Here's yet another Sorbetto.

The black floral making up the main part came from Gramma's stash and is probably from the early 90s. I thought adding another floral for the bias tape would make it more contemporary... but to me it looks like I made another old lady Sorbetto!

Not that there's a problem with that, I'm an old lady at heart.

I bought the purple stuff I made the bias tape from at WalMart, when I went there to pick up the Thomas and Friends fabric. I'd already been planning to make this one, and when I saw the purple stuff, I thought it would be perfect!

...it ended up a little off on some of the colors. But, since I made the bias tape just an inch and a half wide (as opposed to two inches on the Thomas the Train Sorbetto), the two work OK together. floral sorbetto 5You may notice the purple strip down the center of the pleat. I had a lot less of the black stuff than the 1.5 yards called for in the Sorbetto, but I knew there was still enough to squeeze a top from it. So instead of cutting the front on the fold, I just cut it twice in two different spots. To stitch it together, I put a strip of the contrast in between, but only decided to do so after I cut it into a 1.5 wide strip. floral sorbetto3The Sorbetto is still a little wide in the hips for me, but I've gotten it to the point that it fits much better than my first Sorbetto. I'm basically cutting a 16 down the sides and at the top shoulder seam, while leaving the armscyce, neckline, and length an 18 (or longer). The darts I put at size 16. floral sorbetto7
1990's Floral Tank
Pattern: Colette Sorbetto (free)
Materials: Purple floral quilting cotton (I don't remember what I paid for this half-yard, but I think it was ~$6/yd - WalMart), black & purple floral fashion fabric (free - Gramma)
Total Cost: Under $8, probably around $5 or less

Tuesday, May 8, 2012

Colette Sorbetto: Thomas & Friends

This is my second go at Colette's Sorbetto.

Yes, it is Thomas the Tank Engine, and yes, I am a 31-year-old woman.

Normally, my frugal ways would have me turn away from a top I can only wear once (my son's birthday party). But I actually justified the time and money put into this top by deciding that I'll also be that nerdy mom who wears it to Day out With Thomas in the Santa Cruz Mountains later this summer, whenever we take the baby to Sonoma Train Town, and when we get around to riding the Skunk Train with my in-laws. Heck, I've never ridden the Niles Canyon Railway, and it's in my own backyard-- maybe it's time I took the kiddo there in my Thomas shirt, too. Are there any other train excursions in the greater Bay Area/NorCal I left out?

Onto the top: I cut a size smaller on the sides and shoulder this time, but left it an 18 on the length, armholes, and neckline. It fits much, much better than the Granny Shorts Sorbetto, but there's still room for improvement. I know what many people like about the Sorbetto is the hip room, but even though I'm plus-sized, I find the hips too roomy and will cut it straighter down the sides next time.

For bias tape I used the stuff I intended to be quilt binding here, so the exposed bias facing is pretty wide and very stiff... it kinda makes the neckline and armhole sit up strangely, which I don't mind. What bothers me more about the bias tape is how the polka dots are just kinda a couple of rows here and there. Oh, well.

Oh yeah, I also sewed the bias tape down either side of the pleat, like flat piping.

Only two more Thomas posts to go-- I promise.
Thomas & Friends Tank Top
Pattern: Colette Sorbetto (free)
Materials: Thomas & Friends quilting cotton (~$6/yd - WalMart), red polka dot fabric (free - Gramma)
Total Cost: Under $10, probably around $8

Monday, May 7, 2012

Completed: Thomas the Tank Engine Toddler Stack and Slash Quilt

Are you sick of seeing Thomas the Train here yet? Because I've got about three more posts to go after this.

But the LO's Bday is today, so I promise we're almost done!

Also done: the quilt! Last seen here and here.


I didn't end up using the dot bias tape I showed you here; I decided it was too narrow. I scrapped together some of that same fabric and the red leftover from this to make the quilt binding instead. I like how the two turned out together.

There are loads of mistakes, but it IS my first quilt in a good 15-20 years, AND my first one all by my lonesome (without Gramma's help). I'll get better... hopefully.

There are six "stacked and slashed" fat quarters, with the seventh FQ providing sashing in between each row of two. It's a combo of tied with red yarn and machine quilted.

Thomas & Friends Stack & Slash Toddler Quilt
Materials: Thomas & Friends FQ Bundle ($7 - WalMart); pillow ticking, yarn, and red fabrics all from Gramma; extra Thomas fabric from here for the border; batting (~$7 - Jo-Ann sale)
Total cost: Under $20, but we all know quilts cost waayyy more to make than just the materials!

Friday, May 4, 2012

Before & After: Grandma shorts Sorbetto

I've jumped onto the Sorbetto bandwagon by making one from a pair of Granny shorts. Literally.

These started out as a pair my late Gramma's shorts... and basically ended up as one of her shirts.

I was hoping that the yellow bias tape and contemporary pattern would make the shirt look "younger", but to me it really does look like something my Gramma would've worn. Not that there's anything wrong with that, I'm still wearing it-- and I even got a compliment on it, but it was one of those that she might as well have said "wow, that's some top you got there!" compliments.

I'll probaby wear it a couple of times more. Which may be all it lasts-- I noticed a couple of small holes AFTER I'd already cut the pattern and decided to sew it anyway.

As for the Sorbetto pattern, I'm making it again, but I'm cutting it smaller. My bust is 45", so I followed the pattern's advice, which says:
Colette Patterns have less ease than many other patterns to provide a closer, more tailored fit. If you are between sizes, choose the larger size.
Yeaaaah, not so much. I made the largest size and was swimming in it. I had to take it in on the sides, and even then my husband was calling it my "short and wide" top. I could stand to go down one or even two sizes in it.

NOT that I'm complaining about a totally awesome free pattern.
Granny Shorts Sorbetto
Pattern: Colette Sorbetto
Pattern alterations: smaller pleat to fit my fabric and lengthened slightly
Fabric: Gramma's shorts (free)
Notions: Yellow bias tape (.50 cents - thrifted)
Time to make: an afternoon
Total cost: ~.50 cents

Thomas & Friends birthday party bunting (fabric)

Here's some bunting I made for the LO's first birthday party! As I mentioned before, his party theme is Thomas  & Friends.

Not going to write out a tutorial, but here's the method I used:
  • I did some light math and determined how many triangles I wanted, how far apart, and how large they should be.
  • Based on those measurements, drew and cut out my Isosceles Triangle pattern.
  • Cut out twice as many triangles as I wanted to end up with, so that each would have a front and back.
  • Sewed down each of the longer two sides, right-sides together.
  • Turned them right-side out and pressed.
  • Pinned and sewed them into thrifted double-fold bias tape, one seam at the top and one at the bottom of the tape.
I used a red paisley fabric from Gramma's stash. I was hoping it would  give off a train engineer's bandanna vibe, but truthfully, it was the only red in the stash. I bought a yard of the only Thomas cotton that Jo-Ann's had (before I found these fat quarters), but some of it ended up getting used in the quilt anyway. Yellow bias tape was the best match I had, and goes with Thomas's painted on number "1".

It'll hang in his room when the party's over.

I made a paper bunting too (haven't taken pics yet), and the quilt is actually done (camera died with pics on the cam's "hard drive")... watch for both here soon.

Thomas & Friends Fabric Bunting
Materials: red fabric (free - stash), Thomas the Tank fabric ($9.99 with a 50% coupon ~ $5 - Jo-Ann), bias tape (.50 cents - thrift store), thread
Total cost: ~$5.50

Wednesday, April 18, 2012

Project: DIY Retro Bread Box

Please excuse the blurry iPhone photos, I promise better photography in the near future.

I've already shown you the inspiration for this and told you all about how I've wanted a vintage enamel bread bin but can't quite seem to afford one. (And lest you cry out "but I always see them in my thrift stores," here's where I complain that my neck of the woods just does NOT have good thrift shops).

I racked my brain for a while on how to paint letters onto a readily available metal bread box. What kind of food-safe enamel paint would go on neatly? And how do I get it to not look so much like a stencil, just like my inspiration?

But first, the box. I found this cute retro bread box on Amazon, and for the longest time, that was the one I planned on buying... until I saw the one above at Target for about $15 cheaper. The garage-door-style one above isn't exactly the style I wanted, but I couldn't pass it up for the price. I may still buy the Amazon one at some point. Sorry, they longer have this one at Target for me to link to.

And now, the solution to retro-fy it... vinyl stick-on letters. They're a true black and a good font for the look I was going for. They're just permanent enough, but not too permanent that I couldn't preposition them. Yes, they're crooked in the picture below. That's the beauty of it; after this picture was taken, I straightened them out. And then was too lazy to re-take the picture.

These basic black ones I found at Wal-Mart in the poster section for I think about $3.99, maybe even $2.99. But I saw similar ones at Office Depot in different colors and fonts, which might be fun to try also! It looks like Amazon has some too.


DIY Retro Bread Box
Materials: bread box ($17.99 - Target), vinyl letters (~ $3.99 - WalMart)
Total cost: Under $25

This project is linked at:
The Frugal GirlsI Heart NaptimeUnder the Table and DreamingSew Many WaysPetite HermineNifty Thrifty ThingsLamb AroundHomemaker on a DimeRaising MemoriesMy 1929 CharmerFlamingo Toes, Sumo's Sweet Stuff, Making the World Cuter, Craft-O-Maniac, Sew Can Do, Delicate Construction, Mad in Crafts, Creating my Way to Success, KDBuggie Boutique, Tip Junkie, Today's Creative Blog, Vintage WannaBee, Creative Itch, Ladybug Blessings, Funky Polka-Dot Giraffe, Ginger Snap Crafts, Polka Dots on Parade, Lil Luna, Someday Crafts, Southern Lovely

Tuesday, November 1, 2011

Project: DIY Nursery Letters

When I was a kid, I was always super disappointed whenever I perused personalized souvenirs. You know the ones; keychains, license plates, and shotglasses that come already emblazoned with common names. I could never find my name.

So now, I love the chance to personalize anything I can. That's carrying over to purchases for my son, too. So even though nursery letters are becoming pretty cliched, I still wanted to make some. In fact, since his first name is so short, I decided to plow forward into his middle moniker as well.

They're pretty straightforward, so I'm not going to insult your intelligence with a tutorial. I wanted the "cobbled together and collected from various sources" look, so they intentionally have different fonts and paint designs.

UPDATE: I've had lots of people landing here looking for ideas to DIY their own, so even though I didn't photograph a tutorial, here's a list of what I did (see below the new picture for a list of tools and materials):
  1. Shopped at local craft and hobby stores (and one big box chain!) for mismatched letters.
  2. Sketched out the letters on paper (see the new picture below), and drew designs on the letters so that I wouldn't have the same patterns too near each other.
  3. Came up with a color scheme, and just like the patterns, sketched it on paper so I wouldn't have too much of the same color too near each other.
  4. Lightly sanded the letter with a fine-grit sandpaper. I was mostly looking to smooth out the manufacturing imperfections.
  5. I considered priming them, but didn't! I got right to painting the base coat on each letter. Some took more than one to get the base as dark as I wanted it.
  6. Once they'd dried, either free-handed the next design layer, or started applying painter's tape. (TIP: paint the base coat over the painter's tape before changing colors. This'll keep the second color from seeping under the tape).
  7. Finished each one off with a layer of clear spraypaint! DUNZO.
DIY Nursery Letters
Acrylic craft paint on wood
Letters: From Richard's and WalMart, $1.99 - $2.49 each, approximately $18 total
Paints: On sale for 50 cents each at JoAnn (Purchased in Navy, Cobalt, Orange, White, Black, Yellow, Red, then mixed)
Foam brushes: $1.99 at JoAnn
Crackle medium: $2.49 (Used on letters "T" and "L")
Clear spray paint finish: About $3.69 at WalMart, KRYLON in Satin
Total project cost: Approximately $29

Thursday, April 1, 2010

Knitted Slouch Hat


Slouch hat, no pattern. I think it was size 10 29" circular needles? Maybe they were shorter. I don't remember how many stitches I cast on at the start, either, but I measured my head and multiplied by 4. Lion brand acrylic, after the ribbing it was 8 rows stockinette (brown yarn) and 8 rows garter stitch (teal). Increased every 20 stitches until desired slouchiness and then started a fast decrease every 8 stitches, finished on size 8 dpns (didn't have size 10 dpns).

Wednesday, March 31, 2010

How could you be so heartless...

This is my rendition of the Heartfelt Gaiter posted on Craftzine, and the last project my beloved Grandmother helped me on before she died on March 12th. I finished it in February, and it's my first ever attempt at cableing. The project calls for size 15 16" to 24" circular needles, but I only had 29" needles. I ended up adding an extra cable repetition to the pattern to accomodate my long needle, good thing I did because otherwise it would not go over my head. Clearly my gauge was off... (I never checked it). I used two strands of Lion Brand acrylic. I also STILL need to weave in those ends!

Tuesday, March 30, 2010

Giddyup Cake

 
I made this horse head cake for my mom's birthday.

She's a paint horse. You can see I just sort of slathered the frosting on with a spatula and butter knife as opposed to piping it on. She's based on this cake, and I for the most part followed that template when I cut the two cakes up and pieced them together, but when it came time to decorate the cake, I took some liberties. I left out the halter, used pretzels instead of licorice for her mane, and used M&M's for her eyes and notril. I also used used a rectangle pan for parts C & D instead of a square pan, which meant less wasted cake.

As cake decorating goes, I'd probably call it a Fail-- a cake only a mother could love. Both my brother and I though the cake looked more like a mule than a horse. But mom sure liked it and that's what matters!
Related Posts Plugin for WordPress, Blogger...