Pages

Showing posts with label kitchen and dining. Show all posts

Wednesday, July 25, 2012

DIY chalk paint dining chairs: a review

After the dining table was completed and in place, it took us weeks to find dining chairs. I was set on finding some metal Tolix style knockoffs, and was probably going to buy some from Overstock.

But then my husband brought home four chairs from a yardsale for just five bucks for the lot.  Yes, the same husband ( I do only have one, afterall) who bought two desks for $10 from a different yardsale.

The four chairs were three matching blond/yellow wood ones (sorry, I forgot to take before pictures!) and a fourth black one (that one lives by the computer now).
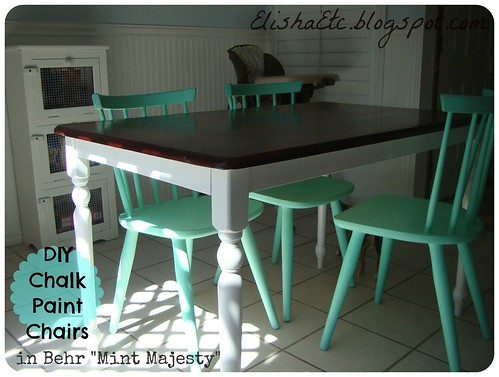
behr mint majesty
I've already mentioned our small dining area is a challenge to find furniture for, and it was going to be an even bigger challenge to find the right-sized chair for the teeny dining table.


My husband had intended these chairs to be temporary, and I agreed; I hated their yellow-and-mildew color tones!

But as time wore on, I realized they were just the right size. And, we already had them anyway... time to mend and make do.
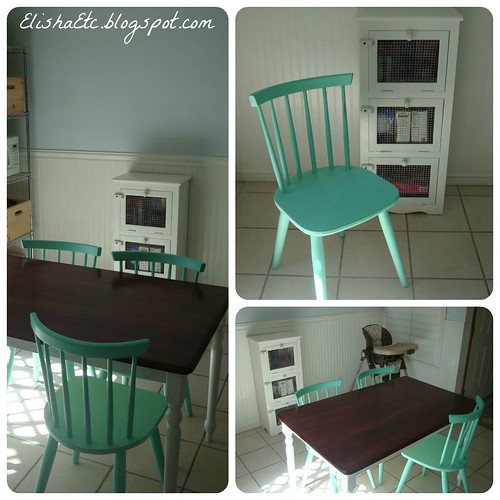
mint chalk paint chairs
First, I tried spraypaint. The Rustoleum Satin Green Apple just wasn't the right shade OR finish. So the lone spraypainted chair sat outside for a few days before I decided what to do next. That decision came to be chalk paint.

I probably don't have to tell you that Annie Sloan Chalk Paint is taking the web by storm. I was totally surprised to find that there's an AS retailer in my town, and was all prepared to pay for it.

But then, I got to thinking... I guessed it was around $35 bucks for a quart of Annie Sloan, and I was pretty close. These chairs were just $1.25 each. It seemed to sort of go against the frugal find that they were if I were to cover them in expensive paint. Plus, there wasn't the right shade of minty green on the AS color chart.

I'd already been seeing all the DIY chalk paint recipes when this post popped up on Apartment Therapy. Most recipes have you mix Plaster of Paris, water, and latex paint in precise measurements and ratios, but the one on AT said the gal kinda winged it until she found a consistency she liked. Works for my lazy artsy, go-with-the-flow self.

I planned on using the lines on the side of my quart container to make pretty precise measurements, and filled Plaster of Paris up to the first line. I thought I was putting water up to the second line when I noticed there was way too much water.

Instead of dumping out the water and PoP to start over like I should have, I went ahead and added my paint, Behr latex paint and primer in one in the color "Mint Majesty". It took a lot of paint to catch up to all the water, and I got a very watery DIY Chalk Paint mixture to work with.

Still, I loved how my first chair came out. I'd done minimal sanding and hadn't technically primed it, which is a supposed benefit of chalk paint-- especially if you're using the real Annie Sloan deal. But it HAD been painted with that apple green Rustoleum, which was acting like a kind of primer.

The next two chairs were another story. With having a little one, I didn't get to do all three at once. So my DIY chalk paint mixture sat overnight. Maybe I should have Googled whether or not leftover DIY chalk paint keeps.

By the next day, the PoP had settled to the bottom in a thick layer. The water was on top. I mixed it up and started painting anway.

I love the color of all three chairs, although I think the first one came out more saturated because of the layer of apple green underneath. But the second two also came out with some large glops of PoP here and there thanks to the day-old mixture. There are brush strokes on the seats, while the first one came out with a smooth seat.

I distressed all three before finishing them off with a couple of layers of Minwax pastewax.

The verdict: I might use DIY chalk paint again, but not for any projects I have in my current queue. This hasn't turned me off from trying the real ASCP, but I think the price for AS has. I like my Behr latex paint and primer in one and plan on mostly sticking with that.

This post is linked at:
Ginger Snap Crafts, Someday Crafts, Southern Lovely, House of Hepworths, Momnivore's Dilemma,

Tuesday, July 24, 2012

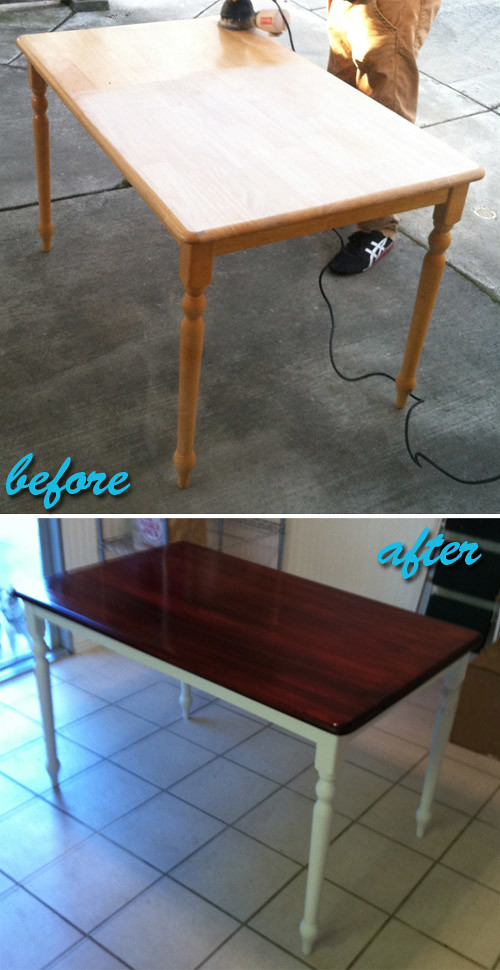
Before & After: Dining Table Makeover

Our dining area in our small eat-in kitchen is a challenge to get just the right-sized table for.

We'd first bought an awesome mahagony table off Craigslist for just $40... and it ended up being way too big.
farmhouse table before after
So we snatched this table up when we saw it at the thrift store. It was priced higher than I wanted to pay for a rinky-dink table like this, even on sale, but it was the right size for the space.

I directed my husband to remedy the yellow/orange wood with a coat of dark stain on the top, and to paint the base white. I'll just say, I would've used different materials than what he chose (spraypaint and all-in-one stain/poly), but it's still pretty close to what I wanted. I wish he would've put one more coat of poly or the stain/poly on top, but I love the color.

I know I usually post a materials breakdown, but I have now idea what either of these colors are! A satin Rustoleum on the spraypaint with no top coat, and the stain/poly in one is most likely by Minwax.

Friday, May 25, 2012

Thrifty finds: woah mama!

For all the complaining I do about our local thrift stores on this blog, I was bound to have some good luck sooner or later.
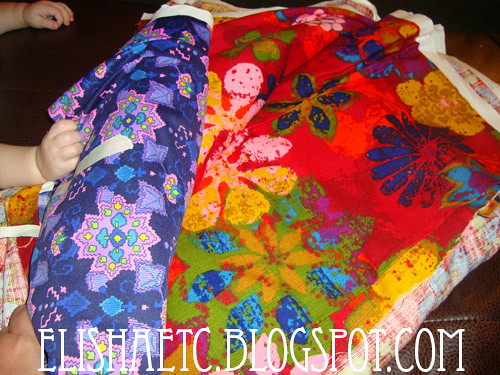
60s fabric
First up, this fabric, which my sweet baby's chunky little wrist is helping to model. To the left is a 100% groovy polyester. It's so totally 60's and much more navy in person.  It reminded me of a more angular Amy Butler print. It's 2 1/2 yards and I paid a buck a yard.

On the right is a whopping 8 1/4 yards of mid-century upholstery fabric. IN LOVE. Paid nine bucks for it, and I can't wait to find the perfect re-upholstery project for it.

I almost titled this post "I will NOT buy more fabric, I will NOT buy more fabric," but it's finds like this that make me glad I don't stick to that mantra. I can't believe I was initially on the fence about buying this fabric!

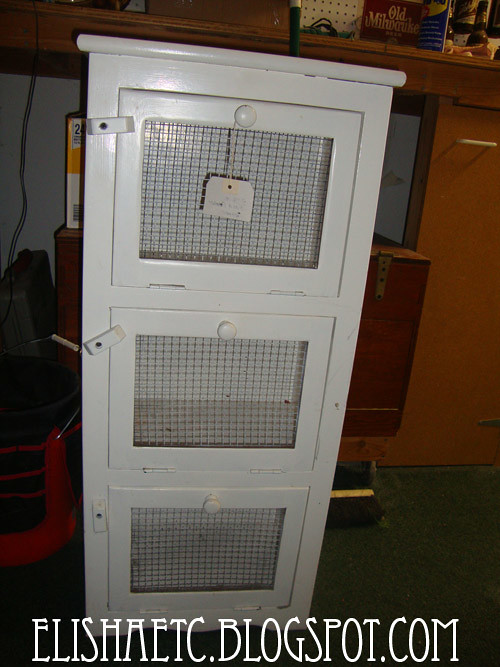
food pantry
I got this sweet little food pantry, which will be great for storing pastas and canned goods. If I didn't need it in the kitchen, it would be great towel storage in the bathroom, or a sewing stuff holder. It was marked $39 and I was all ready to pay that, but it rang up for $27 including tax. Gotta love surprise sales!

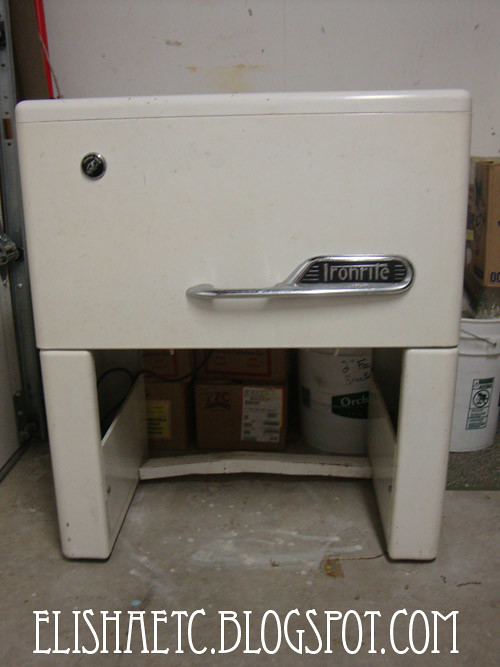
ironrite mangle
Here's the doozy; my husband brought me home an antique Ironrite mangle so I can iron my yardages and quilt tops quickly. I wish I took a picture of the manual-- it has a lady holding an extremely stiff baby girl's dress, like a piece of cardboard. He tells me it was originally $100, but wasn't selling so they marked it 75% off. So he bought it for $25, plus the manual, and the chair.

And, if you're a design freak, yes, it came with the mint condition Ironrite Health Chair (not pictured). Yes, THAT Ironrite Health Chair.

Wednesday, April 18, 2012

Project: DIY Retro Bread Box

Please excuse the blurry iPhone photos, I promise better photography in the near future.

I've already shown you the inspiration for this and told you all about how I've wanted a vintage enamel bread bin but can't quite seem to afford one. (And lest you cry out "but I always see them in my thrift stores," here's where I complain that my neck of the woods just does NOT have good thrift shops).

I racked my brain for a while on how to paint letters onto a readily available metal bread box. What kind of food-safe enamel paint would go on neatly? And how do I get it to not look so much like a stencil, just like my inspiration?

But first, the box. I found this cute retro bread box on Amazon, and for the longest time, that was the one I planned on buying... until I saw the one above at Target for about $15 cheaper. The garage-door-style one above isn't exactly the style I wanted, but I couldn't pass it up for the price. I may still buy the Amazon one at some point. Sorry, they longer have this one at Target for me to link to.

And now, the solution to retro-fy it... vinyl stick-on letters. They're a true black and a good font for the look I was going for. They're just permanent enough, but not too permanent that I couldn't preposition them. Yes, they're crooked in the picture below. That's the beauty of it; after this picture was taken, I straightened them out. And then was too lazy to re-take the picture.

These basic black ones I found at Wal-Mart in the poster section for I think about $3.99, maybe even $2.99. But I saw similar ones at Office Depot in different colors and fonts, which might be fun to try also! It looks like Amazon has some too.


DIY Retro Bread Box
Materials: bread box ($17.99 - Target), vinyl letters (~ $3.99 - WalMart)
Total cost: Under $25

This project is linked at:
The Frugal GirlsI Heart NaptimeUnder the Table and DreamingSew Many WaysPetite HermineNifty Thrifty ThingsLamb AroundHomemaker on a DimeRaising MemoriesMy 1929 CharmerFlamingo Toes, Sumo's Sweet Stuff, Making the World Cuter, Craft-O-Maniac, Sew Can Do, Delicate Construction, Mad in Crafts, Creating my Way to Success, KDBuggie Boutique, Tip Junkie, Today's Creative Blog, Vintage WannaBee, Creative Itch, Ladybug Blessings, Funky Polka-Dot Giraffe, Ginger Snap Crafts, Polka Dots on Parade, Lil Luna, Someday Crafts, Southern Lovely

Monday, April 2, 2012

Where to buy a hobnail jadeite cake stand?


Doesn't the Meadowbrook Farm have the most gorgeous kitchen? Check out her Jadeite collection if you haven't already...

Thanks to this post, I am getting tons of hits from people looking for places to buy a hobnail jadeite cake stand.

The answer is... I don't know. Which is why I wrote the post in the first place.

The obvious choices are eBay, which will have both vintage and reproduction jadeite cake stands from time to time, as well as Etsy and your local antique stores and dealers.

If you're willing to do without the hobnail, Amazon has repro jadeite stands.

My choice is still, as I mentioned in my previous post, Fishs Eddy, which doesn't just have new jadeite... it also has new stuff that looks like vaseline glass, cobalt depression glass, and blue milk glass cake stands.

Friday, March 30, 2012

Project inspiration: retro bread boxes

UPDATE: Here's the post with my DIY Retro Bread Box based on the following vintage bread bins.

I've been pining away for one of those vintage enamel bread boxes with the word "BREAD" emblazoned across them for a couple of years now.

It all started when I thought I would get into making my own sourdough bread, and I was looking for the best way to keep it once it'd been made. Metal bread boxes turned out to be the answer.

My sourdough starter died, but my desire to own a metal bread bin did not.

Too bad the kind I like mostly start in the 60 dollar range.

I've pinned a bunch on my kitchen Pinterest board, hoping to DIY one for much cheaper. I've come up with a decent solution, but before I show you the project, I wanted to share some of my inspiration...


Tuesday, August 23, 2011

IKEA Emeryville wants to "Fix This Kitchen"

IKEA apparently has some series called "Fix This Kitchen". Never heard of it.

Buuut... it sounds like a great opportunity:
Do you have a friend or loved one who has a real passion for cooking but is trapped in an outdated, nonfunctional, unorganized or just plain ugly kitchen? Now's your chance to nominate him/her to receive a kitchen worthy of a gourmet chef! 
IKEA's hit series, Fix this Kitchen, has decided to make an extra, very special online episode... but we need a kitchen to renovate and we need one NOW! 
We are looking for homeowners who LOVE to cook but are in desperate need of a completely new kitchen. We are also looking for YOU...our accomplice in this mission. If your nominee is selected, you will help our team SURPRISE your loved one with a top-to-bottom kitchen makeover from IKEA. . .. and we'll be there film the whole renovation.
The casting call I spotted on Craigslist says you CANNOT nominate yourself, probably because they want the whole accomplice/nominee duo. The duo also has to live in the same area within an hour's drive of the Emeryville IKEA (no mention of the one in East Palo Alto), and "either the Accomplice or Nominee must own the home that is to be renovated". Sooo... a landlord can nominate their renter and get a free kitchen? That's kinda sketchy.

The best part is, the labor and new kitchen are free. But, in a rare peep inside the world of home makeover shows, the casting call says the IRS will be notified of the gift and you're going to have to pay taxes on it.

Anyway. To apply for a kitchen makeover from IKEA Emeryville, and have it shown on "Fix This Kitchen", apply at FixThisKitchen.com.

And to watch the mystery show this design TV lover has never even heard of, tune into A&E on Saturday mornings. (That's right, I'm IN BED Saturday mornings. And the only time A&E is on in our home is when my husband is watching those creepy "The First 48" shows. Or "Hoarders". Or "Intervention". Or "Storage Wars". A home design show on A&E makes as much sense as one on TLC... wait a minute.)

Thursday, August 18, 2011

Things I fancy: Star Wars Tea Towels

For some reason, I have a tea towel obsession right now. I think it started when I bought some colorful ones on clearance from Target for just a buck for a two-pack.

Coincidentally, I spotted these on Apartment Therapy. I really, really want these Japanese Star Wars tenugui, a type of cloth that I can use for tea towels. It's an amazeballs, colorful and functional tribute to one of my childhood favorites. Too bad they cost a lot more than fifty cents each.

Related Posts Plugin for WordPress, Blogger...