Pages

Showing posts with label diy. Show all posts

Wednesday, July 25, 2012

DIY chalk paint dining chairs: a review

After the dining table was completed and in place, it took us weeks to find dining chairs. I was set on finding some metal Tolix style knockoffs, and was probably going to buy some from Overstock.

But then my husband brought home four chairs from a yardsale for just five bucks for the lot.  Yes, the same husband ( I do only have one, afterall) who bought two desks for $10 from a different yardsale.

The four chairs were three matching blond/yellow wood ones (sorry, I forgot to take before pictures!) and a fourth black one (that one lives by the computer now).
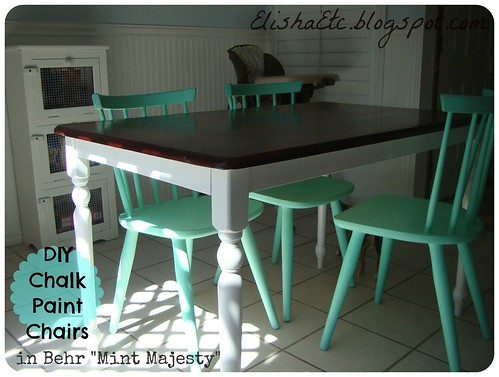
behr mint majesty
I've already mentioned our small dining area is a challenge to find furniture for, and it was going to be an even bigger challenge to find the right-sized chair for the teeny dining table.


My husband had intended these chairs to be temporary, and I agreed; I hated their yellow-and-mildew color tones!

But as time wore on, I realized they were just the right size. And, we already had them anyway... time to mend and make do.
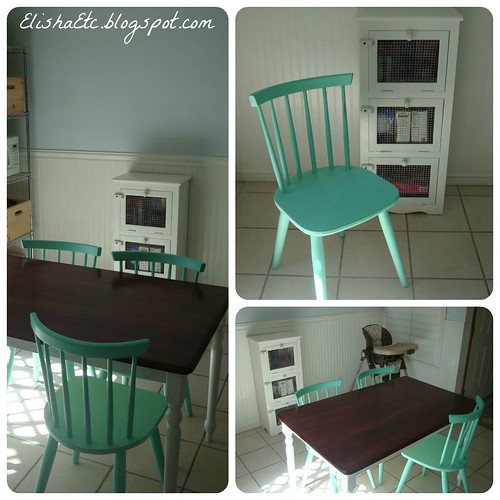
mint chalk paint chairs
First, I tried spraypaint. The Rustoleum Satin Green Apple just wasn't the right shade OR finish. So the lone spraypainted chair sat outside for a few days before I decided what to do next. That decision came to be chalk paint.

I probably don't have to tell you that Annie Sloan Chalk Paint is taking the web by storm. I was totally surprised to find that there's an AS retailer in my town, and was all prepared to pay for it.

But then, I got to thinking... I guessed it was around $35 bucks for a quart of Annie Sloan, and I was pretty close. These chairs were just $1.25 each. It seemed to sort of go against the frugal find that they were if I were to cover them in expensive paint. Plus, there wasn't the right shade of minty green on the AS color chart.

I'd already been seeing all the DIY chalk paint recipes when this post popped up on Apartment Therapy. Most recipes have you mix Plaster of Paris, water, and latex paint in precise measurements and ratios, but the one on AT said the gal kinda winged it until she found a consistency she liked. Works for my lazy artsy, go-with-the-flow self.

I planned on using the lines on the side of my quart container to make pretty precise measurements, and filled Plaster of Paris up to the first line. I thought I was putting water up to the second line when I noticed there was way too much water.

Instead of dumping out the water and PoP to start over like I should have, I went ahead and added my paint, Behr latex paint and primer in one in the color "Mint Majesty". It took a lot of paint to catch up to all the water, and I got a very watery DIY Chalk Paint mixture to work with.

Still, I loved how my first chair came out. I'd done minimal sanding and hadn't technically primed it, which is a supposed benefit of chalk paint-- especially if you're using the real Annie Sloan deal. But it HAD been painted with that apple green Rustoleum, which was acting like a kind of primer.

The next two chairs were another story. With having a little one, I didn't get to do all three at once. So my DIY chalk paint mixture sat overnight. Maybe I should have Googled whether or not leftover DIY chalk paint keeps.

By the next day, the PoP had settled to the bottom in a thick layer. The water was on top. I mixed it up and started painting anway.

I love the color of all three chairs, although I think the first one came out more saturated because of the layer of apple green underneath. But the second two also came out with some large glops of PoP here and there thanks to the day-old mixture. There are brush strokes on the seats, while the first one came out with a smooth seat.

I distressed all three before finishing them off with a couple of layers of Minwax pastewax.

The verdict: I might use DIY chalk paint again, but not for any projects I have in my current queue. This hasn't turned me off from trying the real ASCP, but I think the price for AS has. I like my Behr latex paint and primer in one and plan on mostly sticking with that.

This post is linked at:
Ginger Snap Crafts, Someday Crafts, Southern Lovely, House of Hepworths, Momnivore's Dilemma,

Tuesday, July 24, 2012

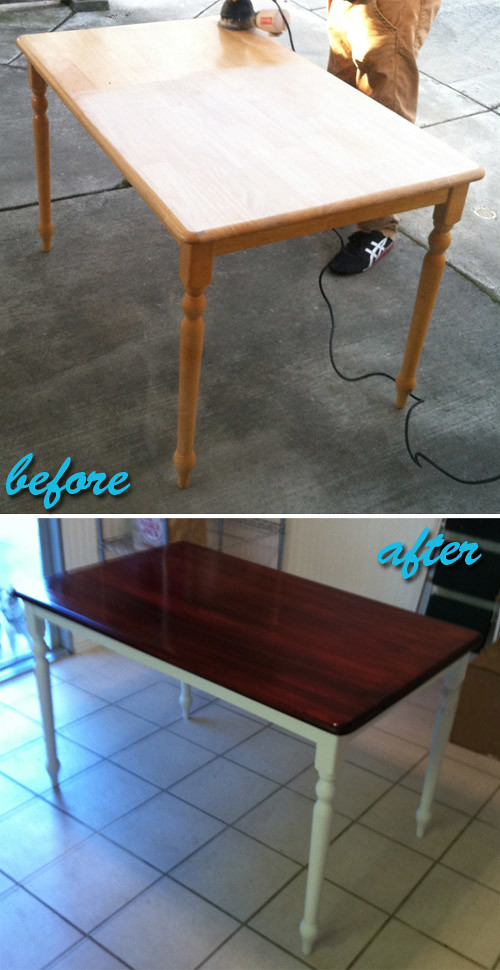
Before & After: Dining Table Makeover

Our dining area in our small eat-in kitchen is a challenge to get just the right-sized table for.

We'd first bought an awesome mahagony table off Craigslist for just $40... and it ended up being way too big.
farmhouse table before after
So we snatched this table up when we saw it at the thrift store. It was priced higher than I wanted to pay for a rinky-dink table like this, even on sale, but it was the right size for the space.

I directed my husband to remedy the yellow/orange wood with a coat of dark stain on the top, and to paint the base white. I'll just say, I would've used different materials than what he chose (spraypaint and all-in-one stain/poly), but it's still pretty close to what I wanted. I wish he would've put one more coat of poly or the stain/poly on top, but I love the color.

I know I usually post a materials breakdown, but I have now idea what either of these colors are! A satin Rustoleum on the spraypaint with no top coat, and the stain/poly in one is most likely by Minwax.

Tuesday, May 22, 2012

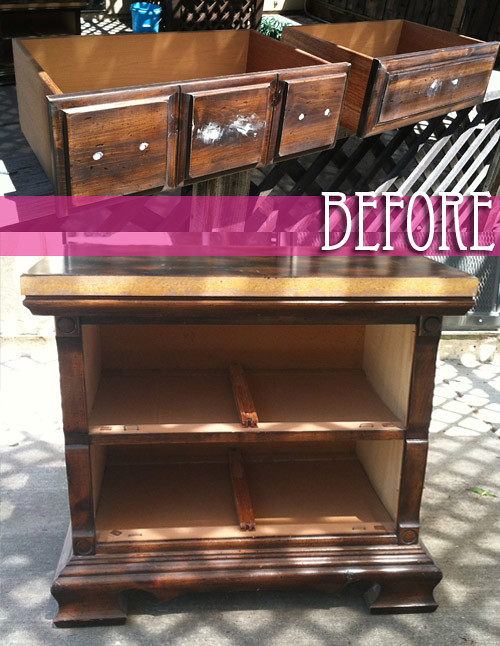
Before & After: nightstand makeover

nightstand makeover before
Shabby chic: ya either love it or ya hate it.

I happen to love it... as long as it's not total overboard like you're living in some countryside Northeastern (1980s) bed and breakfast. I like the muted whites and florals that the look is known for, but I also love color and other graphic prints too much to go full-on with it.

And of course I love vintage, retro, antique... just plain OLD stuff. Always have. So that's perhaps what I find most appealing of all about the SC aesthetic. The aged, loved, worn, and yes, distressed (even it's it's faux distressed) fabrics and woods.

Don't be hatin'.

Among the old things I don't love: 1970s veneer. So when I bought this nightstand, I full intended on painting it all along.

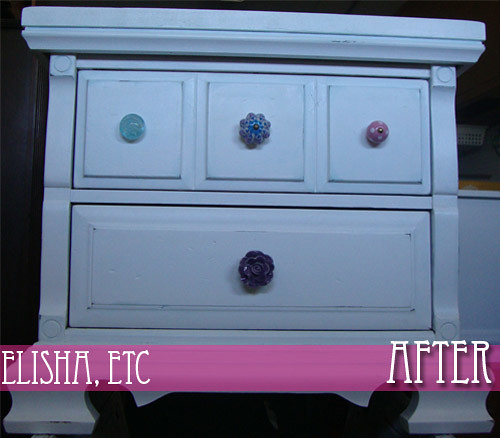
And here she is now!
nightstand makeover after 2
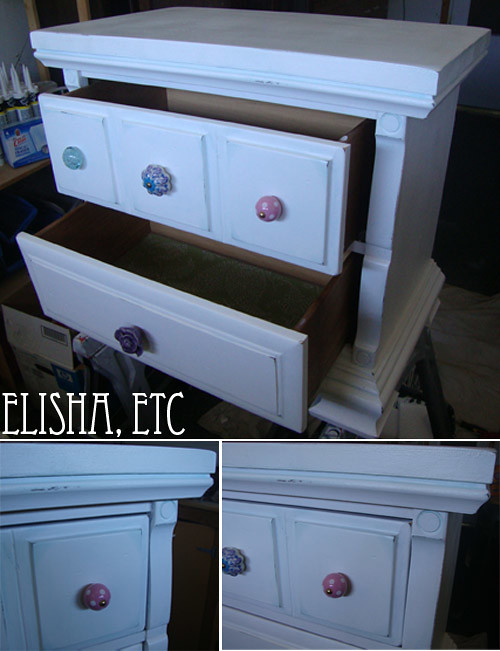
I know you've seen these "white with distressed paint" makeovers all over the blogosphere so it's nothing really special, but I'm really happy with it!

It was my first attempt at making over a piece of furniture. Oh, I've painted plenty of stuff, but I've never sanded, primed, chosen new hardware, done specialty finishes like faux distressing and blue washes, then sealed.

My previous endeavors were "paint over the old paint until you can't see said old paint any longer aaaaannd.. done".

It'll now live next to my bed and probably hold some sewing stuff spilling over from my craft nook. I hope I get to do more projects like this in the future! nightstand makeover after 1
White Nighstand Makeover
Nightstand: veneer and wood nightsand (~16.50 - thrift store)
Hardware: mismatched knobs (~15 - World Market)
Paints: white primer and latex paint in one (husband chose it! $14 for full can used on two night stands - Home Depot), Minwax past wax (~$10 - Lowes)
Total cost: ~48.50

Monday, April 23, 2012

On my Gramma

You know that bumper sticker, or license plate frame, that declares "She Who Dies With the Most Fabric Wins"?

My Grandma won. Sorry.

It wasn't hard for her. A near lifetime of collecting fabric, buttons, appliques, knitting needles, embroidery hoops, pattern books, ric rac and trim, thread... Well, kind of a lifetime, because she really did use it up. So when my cousin and I were clearing out her stash, we didn't come across any amazing vintage finds. We found recent stuff, because she was always crafting and using her stash. Even after she lost her home to foreclosure during the housing crunch, she was still attempting to make quilts in her cramped motor home that would become final place she lived.

In the late 70s and early 80s, I think it was, she owned a yarn and knitting shop downtown. I often wonder, as her oldest grandchild born in 1980, if I'm her only grand kid to remember it.

When I was a little girl, probably around 8 or 9, she worked at a local fabric shop. They held a sewing class for little girls, and of course Gramma had my cousin and I participate. We made pillowcases, one of the first things I ever sewed.

She was the fabric lady at our local WalMart. That was the job she held technically until she died, although she'd been on leave since the football-sized cancer next to her lungs sent her to the hospital months before.

That's one reason she comes up so often on this blog. Much of my knitting and sewing is stash-busting my Gramma's stash. And she taught me everything I know when it comes to knitting and sewing and crafting in general.

But even if I didn't inherit a large part of her stash (about three Rubbermaids of fabric, various notions, knitting needles, at least one Rubbermaid of yarn-- I even took a bunch of her clothes), and even if she'd never taught me anything, it's still her that I inherited my creativity from. She loved decorating her home with things she'd made and made over, long before DIY was a "thing" with countless mommybloggers mommyblogging about it. She toll painted, she  made cheese, she tatted, she made the BEST candy.

Don't get me wrong; she wasn't all about sewing, knitting, cooking, homemaking, and crafting. She'd mastered all of the things a woman of her era was expected to master, but was far from old fashioned. She loved to travel and did so independently. She loved books and even worked at a bookstore or two-- mysteries were her favorite, and again it's her I inherited my love of Science Fiction from. She wrote stories, and even full books that were never published. She was entrepreneurial and an excellent businesswoman. She'd even gone to school for accounting. And she did it all while wearing red lipstick. (I even created a pinboard with all of her interests.)

Of course, lots of people have Grammas or Nannas or Nonnies or Grams whom they love and cherish. But I especially miss mine, and can only hope she would like what I'm creating from her stash.

Wednesday, April 18, 2012

Project: DIY Retro Bread Box

Please excuse the blurry iPhone photos, I promise better photography in the near future.

I've already shown you the inspiration for this and told you all about how I've wanted a vintage enamel bread bin but can't quite seem to afford one. (And lest you cry out "but I always see them in my thrift stores," here's where I complain that my neck of the woods just does NOT have good thrift shops).

I racked my brain for a while on how to paint letters onto a readily available metal bread box. What kind of food-safe enamel paint would go on neatly? And how do I get it to not look so much like a stencil, just like my inspiration?

But first, the box. I found this cute retro bread box on Amazon, and for the longest time, that was the one I planned on buying... until I saw the one above at Target for about $15 cheaper. The garage-door-style one above isn't exactly the style I wanted, but I couldn't pass it up for the price. I may still buy the Amazon one at some point. Sorry, they longer have this one at Target for me to link to.

And now, the solution to retro-fy it... vinyl stick-on letters. They're a true black and a good font for the look I was going for. They're just permanent enough, but not too permanent that I couldn't preposition them. Yes, they're crooked in the picture below. That's the beauty of it; after this picture was taken, I straightened them out. And then was too lazy to re-take the picture.

These basic black ones I found at Wal-Mart in the poster section for I think about $3.99, maybe even $2.99. But I saw similar ones at Office Depot in different colors and fonts, which might be fun to try also! It looks like Amazon has some too.


DIY Retro Bread Box
Materials: bread box ($17.99 - Target), vinyl letters (~ $3.99 - WalMart)
Total cost: Under $25

This project is linked at:
The Frugal GirlsI Heart NaptimeUnder the Table and DreamingSew Many WaysPetite HermineNifty Thrifty ThingsLamb AroundHomemaker on a DimeRaising MemoriesMy 1929 CharmerFlamingo Toes, Sumo's Sweet Stuff, Making the World Cuter, Craft-O-Maniac, Sew Can Do, Delicate Construction, Mad in Crafts, Creating my Way to Success, KDBuggie Boutique, Tip Junkie, Today's Creative Blog, Vintage WannaBee, Creative Itch, Ladybug Blessings, Funky Polka-Dot Giraffe, Ginger Snap Crafts, Polka Dots on Parade, Lil Luna, Someday Crafts, Southern Lovely

Friday, March 30, 2012

The Pinterest Problem: an update

Apparently I'm one of the only people to talk about Pinterest's copyright issues and other problems, or one of the first to anyway, because my October 2011 post "The Pinterest Problem" continues to get hits-- especially as the site grows.

And apparently it's a hot topic, because Pinterest has updated it's Terms of Service.

Of note, an update relevant to my previous post:
We released simpler tools for anyone to report alleged copyright or trademark infringements.
They're also apparently outlawing Thinspo or Pro-Mia type pictures (I did notice some of those disturbing pics on there last year, amid the chevron-print cookies and DIY chair makeovers) and paving the way for private pinboards. Private pinboards, that annoys me... isn't the point of Pinterest to share and discover new things that others have pinned?

Finally, they pulled a reversal on their previous "NewsCorp buys MySpace" type of service term:
Our original Terms stated that by posting content to Pinterest you grant Pinterest the right for us to sell your content. Selling content was never our intention and we removed this from our updated Terms.
I'll end this post by first pointing out that the site is now getting much, much more attention from mainstream media as opposed to just from shelter, fashion, food and tech blogs. I now have twice as many Facebook friends on Pinterest compared with when the year began. Changes are bound to come with such attention.

And, since I hate doing posts without pictures, here are some of my most recent pins:


Tuesday, November 1, 2011

Project: DIY Nursery Letters

When I was a kid, I was always super disappointed whenever I perused personalized souvenirs. You know the ones; keychains, license plates, and shotglasses that come already emblazoned with common names. I could never find my name.

So now, I love the chance to personalize anything I can. That's carrying over to purchases for my son, too. So even though nursery letters are becoming pretty cliched, I still wanted to make some. In fact, since his first name is so short, I decided to plow forward into his middle moniker as well.

They're pretty straightforward, so I'm not going to insult your intelligence with a tutorial. I wanted the "cobbled together and collected from various sources" look, so they intentionally have different fonts and paint designs.

UPDATE: I've had lots of people landing here looking for ideas to DIY their own, so even though I didn't photograph a tutorial, here's a list of what I did (see below the new picture for a list of tools and materials):
  1. Shopped at local craft and hobby stores (and one big box chain!) for mismatched letters.
  2. Sketched out the letters on paper (see the new picture below), and drew designs on the letters so that I wouldn't have the same patterns too near each other.
  3. Came up with a color scheme, and just like the patterns, sketched it on paper so I wouldn't have too much of the same color too near each other.
  4. Lightly sanded the letter with a fine-grit sandpaper. I was mostly looking to smooth out the manufacturing imperfections.
  5. I considered priming them, but didn't! I got right to painting the base coat on each letter. Some took more than one to get the base as dark as I wanted it.
  6. Once they'd dried, either free-handed the next design layer, or started applying painter's tape. (TIP: paint the base coat over the painter's tape before changing colors. This'll keep the second color from seeping under the tape).
  7. Finished each one off with a layer of clear spraypaint! DUNZO.
DIY Nursery Letters
Acrylic craft paint on wood
Letters: From Richard's and WalMart, $1.99 - $2.49 each, approximately $18 total
Paints: On sale for 50 cents each at JoAnn (Purchased in Navy, Cobalt, Orange, White, Black, Yellow, Red, then mixed)
Foam brushes: $1.99 at JoAnn
Crackle medium: $2.49 (Used on letters "T" and "L")
Clear spray paint finish: About $3.69 at WalMart, KRYLON in Satin
Total project cost: Approximately $29

Tuesday, September 6, 2011

Butterick 5731: Kate Middleton's Wedding Dress

A dress in my Facebook feed caught my eye today. Butterick posted a wedding dress pattern that is clearly inspired by what will arguably end up being 2011's most famous wedding dress.

While the description for Butterick B5731 does not explicity say it's meant to copy K-Mid's Sarah Burton for Alexander McQueen, there's no denying it. Butterick even styled their model with a tiara and a similar bouquet.

There are some differences; Butterick 5731 has some weird flappy bustle that I'd leave off were I to sew this, and it's absent the long train that the Sarah Burton dress has.

While I don't usually condone plagiarism, I think in this case it puts the royal dress within reach for us commoners. It's not like you're going to the Berresyessa Flea Market and buying an obvious Louis Vuitton pleather knockoff. This is a sewing pattern in which you, or the dress maker you hire, is required to do all the work, and you have the option to buy the most expensive "Peau De Soie" or the cheapest satin. You can make it any color you choose, and there are even cup size options.

The absolute best part in my opinion: it's a Butterick, so you can likely snatch it up during a Jo-Ann sale for .99 to 1.99.

Tuesday, August 30, 2011

Before & After: Bed to Bench makeover

It's hard to engage in too many DIY projects when a.) I have the LO attached to me pretty much most of the day and 2.) I don't have much of my own space here on the ranch with my parents.

But here's one of my dad's projects: an iron bed up-cycled into a cowboy bench. It was a gift for my mom.

You can see the headboard is the backrest and the footboard was sliced in half to become the arm rests. He welded horseshoes, a bit, and a steer head thing as accents.

I always think I got my desire to create, craft, and DIY from my Grandma, but it must've come via my dad.

I AM! IRON BENCH! DUUUUUH NUH, NUH-NUH-NUH.... DUH NUH NUH NUH, NUH NUH... NUH NUH NUH.

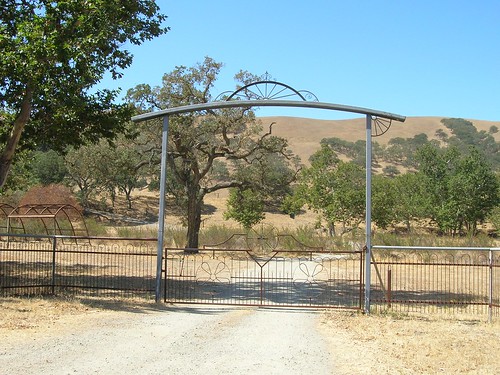
Metal Gate
My dad also welded the front gate, which Flickr user Brave Heart snapped a picture of.

As long as I'm still on the ranch, I'm thinking of snapping a Barn Tour to really give a sense of my dad's design. Consider yourself warned.

Sunday, August 28, 2011

Before & After: China Cabinet Makeover

Psych! It's a PhotoShop mock-up of a china cabinet makeover, and a hastily done one at that.

This is currently for free on Craigslist. I asked my husband about getting it, but we ultimately decided to wait on grabbing any furniture until we were moved off the ranch. I agree.

But I also think he didn't see what this cabinet *could* be, so I started with the 'Shopping. And couldn't stop. An hour or so later, I have a lame picture that serves no purpose (I know my husband will only give it a a quick sideways glance) and STILL NO CHINA HUTCH.

So, why waste that pointless hour I spent doing this when I should've been doing something more productive? I'll just post the image here on my blog, where it can live in perpetuity.

Saturday, August 6, 2011

How to display a beer coaster collection?

My sister Ariel is a big traveler and loves collecting beer coasters (like the ones pictured above from BuenaHelena) from places she visits.

Some time ago, we'd discussed her preserving them in resin so she'd have them forever. We brainstormed what she could use as a mold, and figured she'd need something to keep the ink from bleeding and suspending into the medium. That was a while ago.

Now, she has multiple shapes in her collection (making the mold situation more tricky) and has figured she really doesn't need THAT many coasters, if any at all. So she mentioned making a coffee table top. Good idea (I had similar plans for a vintage postcard collection), but, I had some other ones for her, all keeping with the resined-theme:
  • If she ever buys her own place, she can make them into a counter top for a breakfast bar.

  • If the resin wasn't too heavy, she could frame it and just turn it into wall art. The frame and resin would keep it from looking too frat house. This was her favorite idea.

I also Googled the topic and found this, which starts of good and ends on a facetious note. Still had some good ideas, though, including using them as postcards and luggage tags.

BuenaHelena, the blog the above picture is from, turned them into Christmas ornaments.

Do you have any ideas for an old beer coaster collection? If you've randomly stumbled upon this post, give us your ideas no matter how old this post is.
Related Posts Plugin for WordPress, Blogger...